![]()
![]()
Focusing on Images | |
|---|---|
| May 29, 2007 | |
|
The U of I has a Plant Clinic where physical plant material can be sent for diagnosis and management recommendations (http://plantclinic.cropsci.uiuc.edu/). Extension offices also offer a distance digital diagnostic service, taking images of plant problems and sending the images to specialists throughout the state for comment. An image may tell the whole story, such as an insect or weed identification, some obvious diseases, or possibly a case of improper plant placement. Still, it is often necessary to work with a physical sample to look for fruiting bodies, spores, or bacterial exudate, or to culture for pathogens that might not be visible by the naked eye or with a microscope. Even insect identification may require some manipulation with the physical insect. The ideal case for accurate diagnosis would be to receive a physical sample along with supporting images. If you have a plant problem that you are sending to the Plant Clinic, send images with the sample. Here are few tips to follow. Focus and lighting are the two most frequent image problems. Take the time to get the picture in focus. That seems fairly rudimentary, but we receive many blurred images. If they are blurred, don’t send them. Hold the camera still and squeeze the shutter release button rather than moving the whole camera as you push the button to take a picture. Always have the sun or major source of lighting behind you. When the light source comes from behind the subject, the image is dark, looks like a shadow, and masks details needed for diagnosis. How do you know what pictures to take if you don’t know the cause of the problem? Try to use the pictures to show the diagnostician the complete problem. We will try to determine the cause. Three good pictures are usually all that are needed. Pictures should show (1) the overall pattern in the landscape, (2) the pattern on one plant, and (3) a close-up of the symptoms. Please don’t send more pictures because these take a long time to download and generally don’t add much information. The two images that follow show an entire pine in distress and a close-up showing the wire that is girdling the trunk and causing the damage. 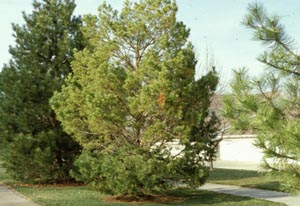 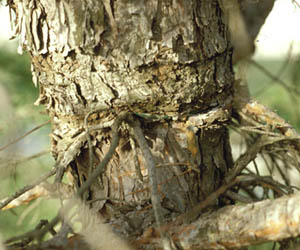 Imagine that you have no idea of the cause of the problem. Be the eyes for the diagnostician. Stand back and get a picture of the entire lawn or garden. This shows the diagnostician the condition of nearby plants, overall damage, possible site problems, and many features you might not think to mention or describe. Next, move closer and take a picture of the entire plant, from the soil line to the top of the plant. For trees, it is important to see how the trunk enters the soil, tree shape and branching pattern, and the pattern of injury. Pull back foliage from around the base of the plant, and take a picture of the base of the plant as it enters the soil. Finally, take an image of the insects, spots, blights, lesions, odd coloring, or whatever particular problem you see. In a few cases, it helps to put the insect or lesion under a microscope to see insect parts or fruiting bodies of fungi. Extension offices are set up to take digital images through dissecting microscopes for more detailed diagnostic work. Often, however, it is not necessary to show that much detail. Although pictures are not necessary to obtain a plant problem diagnosis, they certainly add to accuracy. If nothing else, pictures convey the extent of the problem. Don’t forget to include the data form and supporting document as well, as you would without the images. |